PVS Retries and Quality-of-Service On Cisco UCS

Hello Everyone and Happy Tuesday!

I’ve promised to write a full-blown article dedicated on troubleshooting Provisioning Services retries, but while that’s in the works I’ll share with you all a solution to an issue that I came across in a recent implementation of XenDesktop/PVS with VMware ESXi on Cisco UCS hardware. I’m sure most of you that work with PVS on a daily basis have seen at least some retries in your environment. While a certain amount (0-100) can be deemed acceptable, anything that’s above that count is a cause of concern. As a quick refresher, let’s remind ourselves of what PVS retries are and why they occur.

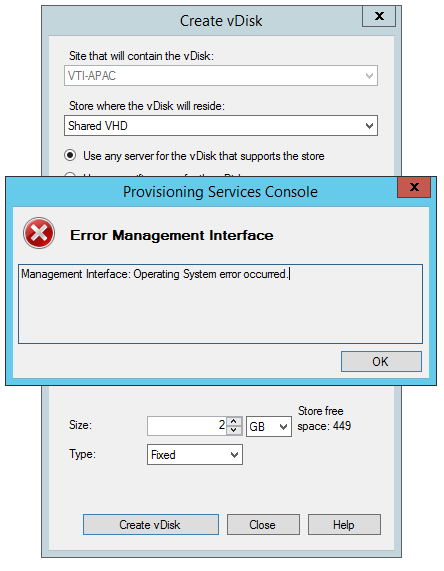
Retries in PVS are a mechanism to track packet drops in the streaming traffic between a Provisioning Server and a target device. Because that traffic is based on the not-so-reliable (however optimized by Citrix) UDP protocol, it’s very important that we don’t put configurations in place that would strangle that traffic to death (surely you don’t want your users complaining about application slowness and session latency). So if one day you look at the Show Usage tab of your vDisk in the PVS Console and you realize you have hundreds or thousands of retries generated on some or most of your targets, you know that something wrong is going on in your environment and it has to be addressed immediately:

PVSRetries

Of course, starting at the physical side and working your way up to the virtual layer is a good approach even though a lot of times the opposite occurs because your network or storage teams will want hard evidence that it’s not your system that’s at fault until they get involved. I recommend involving them from the very beginning and while you are looking at your PVS configuration, they can start investigating routers, switches, cables, storage arrays, and other equipment (it could be something as simple as a malfunctioning switch port or outdated firmware or even a misconfiguration on the VMware vSwitch and the NIC teaming settings). In this particular case, though, everything was configured correctly both on the Citrix side (2 PVS servers on Windows 2012 R2 and 100 Windows 7 SP1 VDA targets with Citrix best practices in place across the board) and on vSphere (6 ESXi hosts in a cluster with Standard vSwitches and virtual adapters dedicated to the PVS traffic). We even checked the firmware in UCS which was slightly out-of-date but updating it didn’t help either.

So what ended up being the issue? QoS! Cisco UCS has Fabric Interconnects (FIs) that provide connectivity for blade/rack servers within your chassis. Just like regular switches, FIs have Quality-of-Service capability that prioritizes traffic based on system classes as shown in the following picture:

UCSQOS

So what if the VNIC that carries out the PVS traffic has a drop-eligible, low-priority, or best-effort weight assigned to it? Yes, traffic will certainly get dropped! As a result, you will see retries generated in the PVS Console and session latency is likely to occur on the target devices. The best thing you can do in this case is to DISABLE QoS for the PVS VNIC in the UCS Manager and reboot all your PVS target VMs. Arguably, you could be fine by just assigning that VNIC a higher priority in the QoS stack but I personally haven’t tested that option and recommend disabling it even if I have to take a bit of heat from the UCS Gurus 🙂

As always, any questions or feedback are welcome in the comments section. I hope this helps those of you who are experiencing this issue or just want to be proactive about it!

PVS 7.6, Windows 2012, SMB 3.0, and Secure Negotiate

Folks,

I hope Y’ALL had a great weekend!
Going back to PVS I wanted to share the resolution to an issue I came across recently during a client implementation. Instead of confusing you with a big giant paragraph, I’ll use one of my favorite templates back from my years on the Citrix Escalation Team.


Environment:

Citrix Product: Provisioning Services 7.6
VHD Storage: EMC Isilon NAS (w/ CIFS shares)
PVS Server OS: Windows 2012 R2 SP1
VHD OS: Windows 7 SP1


Issue:

Attempting to create a vDisk on shared storage failed with Error Management Interface (Management Interface: Operating System error occurred). The same error was thrown both when creating it from the PVS Console and from the target device using the Imaging Wizard. Also, when validating server paths in the vDisk Store Properties, randomly Path Not Found message is displayed.

securenegotiation

Resolution:

On all Provisioning Servers in the environment, run the following command in PowerShell as an Administrator to disable Secure Negotiate in Windows:

Set-ItemProperty -Path “HKLM:\SYSTEM\CurrentControlSet\Services\LanmanWorkstation\Parameters” RequireSecureNegotiate -Value 0 -Force


Explanation:

This behavior can be caused by the Secure Negotiate (also known as Secure Dialect Negotiation) feature added by Microsoft in SMB 3.0 for Windows 2012 which requires that error responses by all SMBv2 servers including protocols 2.0 and 2.1 are correctly signed. If the correct signature is not received back from the SMB client, the connection is cut off to prevent Man-in-the-Middle attacks. Some file servers don’t support this feature and that’s where you would see the most failures. Check out Microsoft’s article on Secure Negotiation by the Open Specifications Support Team HERE (they’re pretty technical BTW! 😉 )

Why Is It Important to Be a Local Admin in PVS?

My Friends,

Today we are going to talk about permissions in PVS and why it is important for the Soap service user to be a member of Local Administrators on your Provisioning Servers.

For the most part in PVS you can get by with just letting the Configuration Wizard do its thing during initial setup. It enables the different services that make the PVS functionality possible (Soap, Stream, etc.) and turns on the necessary permissions on the database. For KMS, however, every time you switch modes from Private to Standard and select Key Management Service on the vDisk, PVS performs a volume operation on the server that requires elevated privileges, specifically the ability to perform volume maintenance tasks and if you are running Soap/Stream under, say, Network Service or a custom=made account, it will likely lack those rights. While there is a GPO that you can enable called “Perform Volume Maintenance Tasks” under \Computer Configuration\Windows Settings\Security Settings\Local Policies\User Rights Assignment\ in GPEDIT.msc and add your account to the member list, you will definitely be better off just adding Soap user to the Local Administrators group on all Provisioning Servers in the farm. You will save yourself a lot of headaches down the road – permissions are always tricky!

Regards,

– The PVS Guy

Hotfix PVS710TargetDeviceWX64001 Is Out!

Folks, I hope you had a great holiday season! The New Year for PVS has started with some exciting news about the new Write Cache option – Cache on device RAM with overflow on hard disk. Introduced with PVS 7.1, it is designed to provide faster performance than Cache on Device HD (which is the most popular method of caching these days) while at the same time fix an issue with Microsoft’s Address Space Layout Randomization (ASLR). The new cache uses a VHDX format which takes care of any issues you may have experienced with crashing applications and print drivers on your provisioned images due to a conflict with the ASLR technique which Microsoft developed to randomize areas of the code in memory and make it harder for hackers to predict the location of certain processes within an application.

With the initial release of PVS 7.1, however, there was an issue with turning on the RAM portion of this hybrid write cache, so you would’ve seen some performance improvement but not what you expected with RAM. The new hotfix PVS710TargetDeviceWX64001 fixes this issue and is now publicly available for download at CTX139850. 

It is a target-side patch so you will need to reverse image your vDisk to do the install. Good luck!

Tip of the Day: Troubleshooting Storage

Hello again, my friends! A quick Saturday-night one-liner if you run into slow performance/boot issues with your PVS targets and you are using shared storage, move the vDisk files (VHD, AVHD, and PVP) local to the Provisioning Server. That way your Stream Process won’t have to travel through the wire to read VHD blocks of data! If that improves performance drastically, you will at least know to concentrate your troubleshooting efforts on the connectivity to the storage device.

How Bad Do You Need DHCP Relay?

Happy Monday, Everyone!

Since we are very early in the week, let’s talk about some failures very early in the boot process of a Provisioning Services target device. First of all, a quick refresher on the Preboot Execution Environment (PXE): it’s a protocol that enables a client machine to boot from it’s network interface and connect to a server resource on the network to retrieve a bootfile program and load an Operating System. When a workstation PXE boots, the PXE client sends a DISCOVER packet to the entire broadcast domain to search for a DHCP server to get an IP address. If it doesn’t find one, it tries a few times and then it times out. I want to underline that this has NOTHING to do with PVS as this target device is nothing more than a PXE-enabled machine that early in the boot process. Failure to obtain an IP due to DISCOVER packet never reaching a DHCP server is in most cases observed in a subnetted network where PVS targets are on one physical segment and DHCP resources are on a another one. Because of a limitation in PXE (so old yet so useful), the broadcast packet hits a stonewall at your router and it never reaches your other segments. How do you get around that? Fortunately, there is a feature called DHCP Relay (also known as IP Helper for specific vendors) that you can enable with a simple command on your router in order to make it “listen” to PXE packets and “relay” them to the next subnet, and the next subnet, and the next subnet until they reach a DHCP destination server.

For specific information on enabling DHCP Relay on Cisco routers, read THIS documentation from Cisco. There is also a nice Citrix article on the topic with screenshots.

Thanks for reading!

A Few Notes on the Load Balancing Algorithm

Isn’t it nice that we can load balance our vDisks across different servers in PVS and spread the load of connections? But how does load balancing occur and when?

The answer is during target device boot. After the target has acquired an IP address and has downloaded the bootstrap file from TFTP (or Two-Stage Boot in the case of BDM) it makes its first contact with the PVS farm by initiating a connection with the login server listed in the boostrap. After the login server determines the device is present in the database and part of a Device Collection within that farm, it uses a load balancing algorithm to calculate the number of active connections on each PVS server and hands the device over to the least busy one. Not too bad!

There is a subsetting of the load balancing properties on each vDisk that you can tweak from the PVS Console called Subnet Affinity. What Subnet Affinity does is prioritize the servers during load balancing based on the subnet they reside on. You have three configurations for Subnet Affinity at your disposal:

1. None

This one doesn’t take into account subnetting and hands the connection over to the least busy server regardless of network location.

2. Best Effort

Here the PVS server tries extra hard to keep the connection on a server in the same subnet. If not possible, it reaches out to the rest of the hosts in other subnets.

3. Fixed

In “Fixed” the Provisioning Server “forgets” other networks and all connections are handed out to hosts on the same subnet. If no one is available, load balancing doesn’t take place at all.

In Provisioning Services Console you also have the option to rebalance your devices manually or automatically using a pre-set % threshold.

Tip. NEVER use both Subnet Affinity and Auto Rebalance at the same time. Find out why HERE.


Citrix Diagnostic Facility (CDF) & PVS 7

Many of us, logging geeks, are used to debugging problems in our infrastructure by looking at historical logs (which most every application nowadays has) to pinpoint these issues. Why? Because generally logs never lie. And people do.

If you deploy or manage a Citrix environment, you are also well aware by now how important logs are for troubleshooting regardless if you do it yourself or you call Citrix Support. In PVS 5.x and 6.x, if logging is enabled, you would normally see the following logs under C:\ProgramData\Citrix\Provisioning Services\Logs:

LogsPicture

Each log corresponded to a process. For instance, if you are troubleshooting an issue with the Console GUI you would be looking at Console.log, the stream process would log to StreamProcess.log, etc. In PVS 7.x, however, server-side historical logging is no longer enabled through PVS nor it’s located under the same directory. Our modules are now integrated in Citrix Diagnostic Facility (or CDF) much like XenApp, XenDesktop and Citrix Receiver/ICA Client. There are two options that you can use to generate and collect a single CDF trace from PVS:

1. CDF Control (download it from CTX111961)

This tool is nice and easy. All you need to do is download it on your PVS server, extract it, run it as an Administrator, and start a trace (preferably select all modules). This works great if your issue is reproducible at will (for example, a MAPI error when launching the PVS Console). The trace is generated as a .ETL file in the same folder you installed CDF Control and can be viewed from the same tool or parsed to a .CSV file to open in a more convenient program such as Excel.

2. CDF Monitor (download it from CTX129537)

This is a very, very powerful utility. A bit more complex to install but adds a real value to your environment. It runs as a Windows service and generates a circular CDF trace under C:\Windows\CDF Monitor. There is a config file that comes with it and for PVS there is an extra step to go to CTX138698 and download the PVS-specific config and place it in the CDF Monitor installation folder to replace the original one. Luckily, full instructions on how to deploy CDF Monitor are provided in the same article. I highly recommend this tool for capturing intermittent issues and root cause analysis of production outages.

Note: CDF tracing is only integrated with PVS 7.x. There are no CDF modules for previous versions. Target-side logging can still be enabled from the PVS Console and is logged into CDF. ConfigWizard and Console logs are still available under the old folder.

Enjoy the deep dive!


About That New Cache Type…

As many of you have noticed, PVS 7.1 has a brand new cache type called “Cache in Device RAM with Overflow on Hard Disk.” This new feature of PVS is designed to provide better performance by combining the light speed of RAM with the efficiency of hard disk storage and at the same time avoiding previous hurdles such as unexpected BSOD when using RAM cache due to the memory getting filled up. The new differencing format of the file (VHDX) also resolves the issue when caching to device HD where applications accessing printer drivers would randomly crash.

As some of you have noticed, however, target device performance has not increased dramatically in terms of speed. In fact, some folks out there with IOMeters have reported that IOPs have not improved at all with the new cache type. This is currently a known issue due to a problem turning on the RAM portion of the cache and I know for a fact that Citrix is working on fixing it in the next hotfix release for PVS 7.1. So stay excited!

Edit:

The RAM portion of the this cache type is fixed in CTX140338 which is a target device hotfix.